Troubleshooting Your Marga Mulino Grain Flaker
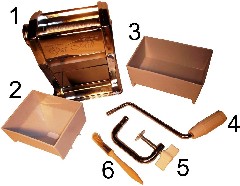
The flaker consists of:
- A base unit
- A hopper
- A catcher
- A hand crank
- A C-clamp
- A brush
- An optional sifter (not shown)
Having a problem? We can help.
The manual grain flaker is a simple device. Fortunately, many flaker problems are easy to resolve. Here are the most common problems users face and some simple steps to resolve them.
Assembled, the unit looks like this.
To attach to countertop, place the narrow end of the C-clamp through both the holes on the outer and inner sidewall on the hand crank side of the base unit. Finger tighten screw of C-clamp until it meets the underside of countertop and base unit is secure.

The small drive gear on the adjustment knob side is probably broken. To fix it, you need to replace the broken drive gear.
You will need: a replacement drive gear, a #2 Phillips screwdriver, needle-nose pliers; and petroleum jelly, shortening, or mechanical grease.
On the hand crank side of the base unit are two Phillips screws and a large adjustment nut. The large adjustment nut is factory set: DO NOT TURN IT or remove it.

The opposite, adjustment knob side of the base unit also has two Phillips screws.

Only remove the two Phillips screws.
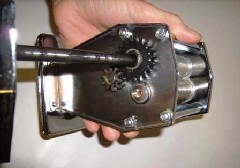
Remove the side plate as an entire assembly, including the adjustment knob and four-inch adjustment rod. When you remove the side plate, be sure to gently pull the adjustment rod straight out of base unit. Set assembly off to the side, with the adjustment knob facing down.

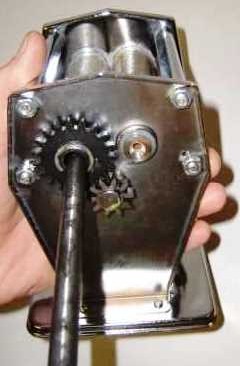
You may see a broken gear. In this photo, a broken gear piece has fallen to the bottom of the machine.

In this photo, the small gear has a crack near the twelve oclock position, but has not fallen off.

Sometimes, the gear is not actually cracked, but has simply come loose. If this is the case, you may continue with the instructions, but do not need a replacement drive gear.

There is a C-clip holding on each gear. It is a flattened piece of wire in the shape of a C.

Grasp one end of the C-clip with needle-nose pliers and gently open the C enough to slide it off the end of the shaft and lift it off. Remove all parts of the drive gear from machine and discard all broken pieces!

Broken drive gear

Replacement drive gear

The replacement drive gear fits on a round shaft with a flat side. It cant go on incorrectly. Place the replacement gear on the shaft and line it up with the large gear.

If the C-clip was twisted during removal, it may be necessary to flatten it in the jaws of the pliers.

There is a groove on the end of the shaft. Place the C-clip on the shaft and fit it in the groove.

Crimp C-clip in both directions, tightening the C into the groove.

Apply a dab of petroleum jelly, shortening, or mechanical grease to lubricate the new gear. Most any kind of grease will be fine, because this part of the machine will never come into contact with your food.

Gently replace the side of the base unit.

Make sure the adjustment rod lines up with the center of factory adjustment nut on the hand crank side.

The adjustment rod goes through the middle of one of the rollers. You may have to wiggle the roller to line it up with the factory adjustment nut on the hand crank side.

Replace the two Phillips screws.

Insert hand crank into opposite side and test to ensure rollers turn smoothly and easily.

The locking pin behind the adjustment knob is bent or broken. You need to bend the pin back into place or replace it.
On the hand crank side of the base unit are two Phillips screws and a large adjustment nut. The large adjustment nut is factory set: DO NOT TURN IT or remove it.
The opposite, adjustment knob side of the base unit also has two Phillips screws.
When the base unit is upright, there is an indicator pin at the twelve o'clock position which indicates the setting on the adjustment knob. There should also be a hidden locking pin behind the knob in the three o'clock position which holds the knob in place. If the knob is mishandled or twisted without pulling it away from the locking pin or if the machine is dropped, it can break the locking pin off or bend it down to the side of the machine.
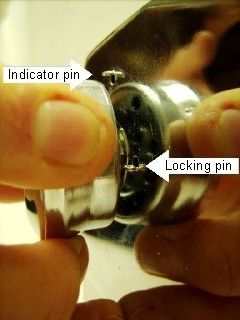
The locking pin might be broken off, or it might just be bent over. If it is just bent over, gently bend it back with needle-nose pliers so it is perpendicular to the side plate as shown in the photo above. That is all you need to do, and the flaker should work fine now.
If the locking pin is broken off you will need to replace the it with a SEMS screw/pin.
You will need: a SEMS screw/pin, a #2 Phillips screwdriver, and a 10-mm wrench or nut driver.
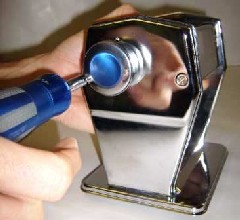
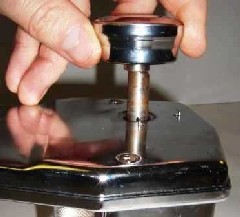
Lay base unit on its hand crank side. Using a dull, thin blade, carefully work your way around the rim, prying the cap off of the adjustment knob.

Lift off cap.

The inside of the knob should look like this.

Using a 10-mm wrench or nut driver, gently remove nut in the center of knob.

After removing the nut, lift off the spring and knob and set aside.

On this same side are two Phillips screws and a large adjustment nut. The large adjustment nut is factory set: DO NOT TURN IT or remove it.

Only remove the two Phillips screws.

Gently lift off the side plate.

Working from the back side, install the small SEMS screw/pin into the hole adjacent to where the pin broke off.

When the pin is installed, it should look like this.

Replace the side plate and two Phillips screws.
Replace adjustment knob, spring (narrow end up), and nut. Gently tighten nut into place. Do not over tighten!
Replace knob cap.

Insert hand crank into opposite side and test to ensure rollers turn smoothly and easily.
After replacing the locking pin, operation of the adjustment knob may be stiff, but should loosen up after a few uses when the sharp teeth of the replacement screw/pin have dulled a bit. It should operate normally after that.
The adjustment rod fits closely inside the center of the back roller, and sometimes a small layer of surface rust or food particles builds up between the adjustment rod and the inside of the roller, causing a high-pitched squeak. To fix it, you need to clean the adjustment rod.
You will need: a #2 Phillips screwdriver; and petroleum jelly, shortening, or mechanical grease.
On the hand crank side of the base unit are two Phillips screws and a large adjustment nut. The large adjustment nut is factory set: DO NOT TURN IT or remove it.
The opposite, adjustment knob side of the base unit also has two Phillips screws.
Only remove the two Phillips screws.
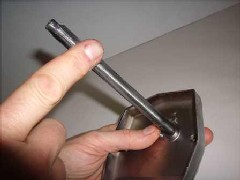
Remove the side plate as an entire assembly, including the adjustment knob and four-inch adjustment rod. When you remove the side plate, be sure to gently pull the adjustment rod straight out of base unit.
The adjustment rod should slide out of the base unit.
Note surface rust on the adjustment rod.

Using a paper towel, gently buff rod to remove the rust or foreign particles.

Once rust is removed, apply a dab of petroleum jelly, shortening, or mechanical grease to the end of the rod. Most any kind of grease will be fine, because this part of the machine will never come into contact with your food.

Spread a thin layer of this over the length of the shaft.
Gently replace the side of the base unit.
Make sure the adjustment rod lines up with the center of the factory adjustment nut on the hand crank side.
The adjustment rod goes through the middle of one of the rollers. You may have to wiggle the roller to line it up with the factory adjustment nut on the hand crank side.
Replace the two Phillips screws.
Insert the hand crank into the opposite side and test to make sure the rollers turn smoothly and easily.
The adjustment knob attaches to the adjustment rod with a spring and a nut. The nut has come loose and the knob came off the adjustment rod. There is probably something loose rattling in the adjustment knob assembly. You need to reattach the adjustment knob.
You will need: a 10-mm wrench or nut driver.
Lay base unit on its hand crank side.

Using a dull, thin blade, carefully work your way around the rim prying the cap off of the adjustment knob.

After removing the cap, you should find a spring and nut inside.
Replace adjustment knob, spring (narrow end up), and nut. Gently tighten nut into place. Do not over-tighten!
Replace knob cap.
Insert hand crank into opposite side and test to ensure rollers turn smoothly and easily.
The adjustment rod is held into the side plate by an adjustment nut which is pressure-fitted into the side plate. At some time, too much pull was exerted on the adjustment knob and the adjustment nut has pulled out of the side plate. Although we can't fix it quite like the factory did, we can reseat the adjustment nut to get it close.
You will need: a #2 Phillips screwdriver, a 10-mm wrench or nut driver, a 14-mm wrench, a rubber mallet, and super glue or clear fingernail polish.
On the hand crank side of the base unit are two Phillips screws and a large adjustment nut. The large adjustment nut is factory set: DO NOT TURN IT or remove it.
The opposite, adjustment knob side of the base unit also has two Phillips screws. There is also a factory adjustment nut on the adjustment knob side of the machine, but it is hidden behind the adjustment knob. This "hidden" adjustment nut needs to be reseated.
Remove the two Phillips screws.
Remove the side plate as an entire assembly, including the adjustment knob and four-inch adjustment rod. When you remove the side plate, be sure to gently pull the adjustment rod straight out of the unit.
Remove loose adjustment knob/adjustment rod assembly from the side plate. Using a dull, thin blade, carefully work your way around the rim prying the cap off of the adjustment knob.

Remove knob cap. The inside of the knob should look like this.

Using a 10-mm wrench or nut driver, gently remove nut in the center of knob.

Set aside the knob cap, nut, spring and knob base.

Remove adjustment nut from adjustment knob.

The adjustment nut has a whole drilled in it, but it is off-center resulting in a wide side and a narrow side of the nut. The wide side is usually set at the factory in the four to five o'clock position on the adjustment knob side. It should not generally be moved. We need to reseat the adjustment nut.

Place the adjustment nut in the proper position and gently tap it into place using the end of the C-clamp and a rubber mallet.

You may need to adjust it with a 14-mm wrench. Turning the wide side of the adjustment nut to between the four and five o'clock position.

Once you get the nut into the desired position, it helps to secure the nut in place by putting a little bead of super glue or clear fingernail polish on two opposite sides of the adjustment nut.
Allow it to dry completely before continuing.
Once it is fully dry, gently slide adjustment rod into the base unit.
Make sure the adjustment rod lines up with the center of factory adjustment nut on the hand crank side.
Replace the side plate and two Phillips screws.
Replace adjustment knob, spring (narrow end up), and nut. Gently tighten nut into place. Do not over tighten!
Replace knob cap.
Insert hand crank into opposite side and test to ensure rollers turn smoothly and easily.
The adjustment nut is pressure-fitted into the side plate. At some time, the adjustment nut was removed or knocked out of the side plate. Although we cant fix it quite like the factory did, we can reseat the adjustment nut to get it close.

You will need: a 14-mm wrench, a rubber mallet, and super glue or clear fingernail polish.
On the hand crank side of the base unit are two Phillips screws and a large adjustment nut. The large adjustment nut is factory set: DO NOT TURN IT or remove it.
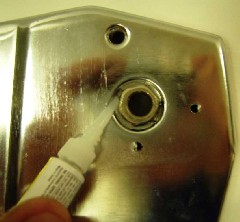
The adjustment nut has a whole drilled in it, but it is off-center resulting in a wide side and a narrow side of the nut. The wide side of the nut is usually set in the seven to eight oclock position on the hand crank side, but it should not generally be moved.

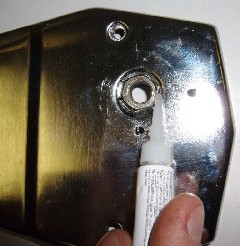
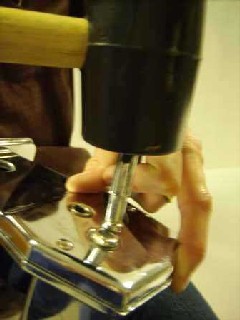
Place the adjustment nut in the proper position and gently tap it into place using the end of the C-clamp and a rubber mallet. Make sure not to apply any force to the rod extending through the center hole on the adjustment nut.

Note how the end of the clamp is in contact with the nut, but not at all with the rod.
You may need to adjust it with a 14-mm wrench, turning the wide side of the adjustment nut to between the seven to eight o'clock position.

Once you get the nut into the desired position, it helps to secure the nut in place by putting a little bead of super glue or clear fingernail polish on two opposite sides of the adjustment nut.

Allow it to dry completely before continuing.

Once it is fully dry, insert hand crank into opposite side and test to ensure rollers turn smoothly and easily.
The base plate and feet are attached to the base unit with four small screws and nuts. You need to reattach the nut that fell off.

You will need: a #2 Phillips screwdriver.
On the hand crank side of the base unit are two Phillips screws and a large adjustment nut. The large adjustment nut is factory set: DO NOT TURN IT or remove it.
The opposite, adjustment knob side of the base unit also has two Phillips screws.
Now you must determine which side of the unit needs to be removed. Remove the two Phillips screws on the side with the missing base nut. Don't remove the screws on the other side.
If you are removing the knob side: Remove the side plate as an entire assembly, including the adjustment knob and four-inch adjustment rod. When you remove the side plate, be sure to gently pull the adjustment rod straight out of base unit. Set assembly off to the side, with the adjustment knob facing down.
If you are removing the hand crank side: Remove the side plate.

Only remove the side with the missing base nut. Leave the other side on the unit.
Locate loose screw and insert through base plate and foot.

Reattach nut and tighten.

Gently replace the side that you took off the base unit.
Make sure the adjustment rod lines up with the center of factory adjustment nut on the hand crank side.
The adjustment rod goes through the middle of one of the rollers. You may have to wiggle the roller to line it up with the factory adjustment nut on the hand crank side.
Replace the two Phillips screws.
Insert hand crank into opposite side and test to ensure rollers turn smoothly and easily.